
Want to know about the embroidery work and download the pattern? If you want to learn how to do the embroidery by yourself, you are right place.
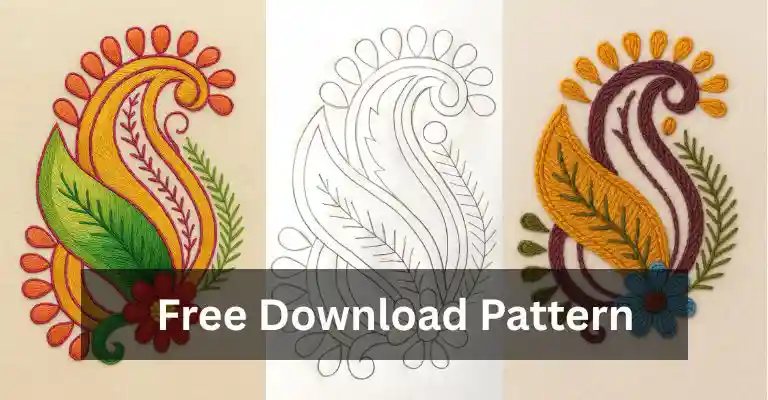
This beautiful hand-embroidered paisley pattern is perfect for beginners who want to learn essential stitches and colour combinations. Here’s a detailed guide to help you recreate this realistic, vibrant design step by step:

Materials Needed:
- Fabric: Off-white or cream cotton fabric (medium thickness)
- Embroidery Hoop: 6-inch wooden hoop
- Embroidery Floss: Anchor or DMC threads in 6 colours
- Dark pink (flowers)
- Deep teal (paisley border)
- Olive green (leaves)
- Mustard yellow (accents)
- Sky blue (background)
- White (highlight details)
- Needle: Size 7 or 9 embroidery needle
- Scissors: Sharp embroidery scissors
- Fabric Marker: Water-erasable pen or tracing paper
Stitch Guide:
- Paisley Outline – Chain Stitch
Use deep teal thread and chain stitch to create a smooth and raised outline of the paisley motif. - Flower Petals – Satin Stitch
Fill the large flower petals with dark pink thread using satin stitch. This gives a rich, smooth texture and realism. - Leaf Fill – Fishbone Stitch
The two sides of the leaves are made using olive green thread in a fishbone stitch, which adds a natural leaf vein effect. - Background Swirls – Back Stitch
The inside swirly designs are stitched using sky blue thread in back stitch for clean, continuous lines. - Small Dots – French Knots
The tiny accent dots (if any) can be done in mustard yellow or white using 2-wrap French knots. - Outline Enhancements – Stem Stitch
To add detail along the edges, use white thread in stem stitch for a clean shadow effect.

Tips for Beginners:
- Always keep your fabric taut in the hoop.
- Use 2 or 3 strands of floss depending on the area you’re filling.
- Test your stitches on scrap fabric before stitching the final piece.
- Secure threads neatly at the back — avoid messy knots.
- Start with the outline first, then move to the filled areas.
Free Download the Pattern

How to download the pattern
- Tap on the pattern.
- Click on “Save as image”
- Or you can take a screenshot
- Now, check your gallery on your phone.
Another Pattern: Floral Whispers: A Journey Through Hand Embroidery Stitches
Thank you.
Optional:
To enhance your design further, you can add small mirror work (shisha) in the centre of the flower or use seed beads for embellishment.
Happy stitching! Tag your recreations with #BeginnerEmbroidery or #PaisleyThreadArt
যেকোন বিষয় লিখতে ভাল লাগে। সেই ভালো লাগা থেকেই প্রযুক্তির এই যুগে অনলাইনে লেখালেখি করি। পাশাপাশি আমাদের এই সাইটে নামের অর্থ, ভ্রমণ ও স্ট্যাটাস সম্পর্কে সর্বশেষ তথ্য প্রকাশ করে থাকি।